RasPI-Surv: a Raspberry-based scalable SMS remote controlled video surveillance system

Good morning dear security systems fanatics Garretlabs fans!

Today you will be very interested in my new post, I’m sure.

Because today we talk about a high-scalable videosurveillance system called RasPI-Surv, based on:

  • A system controller based on Raspberry PI
  • A practical (and modifications-friendly) command/telemetry interface via SMS messages, using the very well known SIM-900 module from ITEAD.
  • A set of wireless video cameras with good motion detection feature
  • A internet router/modem with wireless access point
  • A Google Mail account (it will be your “house account”), to be accessed via IMAP.

I engineered this system after a very strange request from one of my strangest friends. 🙂

He was looking for a “internal” videosurveillance system with motion detection to be used only during his vacation periods…and after the vacation periods he wanted to disable the system and put all cameras and controller inside a box! 😉

In other words he wanted a “portable” internal video surveillance system, without in-the-wall connections, without fixed positions for the cameras, so a very dynamic system with the opportunity to move the cameras and the controller inside his house. Plus, he wanted a powerful and portable alarm siren to be placed in his house, without external components (please note that this DIY solution is not accepted by italian laws, so in our country the alarm device must be always placed by a devoted an credited technician).

A practical example of the siren 12V powered could be THIS  …but you can buy another model following your needs.

Thinking for a smart solution, I studied a system with two day-night wireless IP Cameras from HooToo with pan and tilt features (http://www.hootoo.com/hootoo-ht-ip211hdp-indoor-wireless-network-camera-with-ir-cut-black.html) and two day-night D-Link fixed cameras (http://www.dlink.com/it/it/home-solutions/view/network-cameras/dcs-932l-day-night-cloud-camera). But you could add/remove wireless IP cameras with motion detection featire (also of different brands), in order to add/remove “eyes” to your system.

So, this is a very scalable solution. 😉

Firstly I placed the cameras near a wall power socket (ok, they are wireless..but unfortunately they need power… 😦 ), then I connected all cameras to the internet modem/router following their own user guides.

Finally I enabled their motion detection feature with the email sending (using the “house Google Mail account”) of the captured frame when a motion is detected.

Note that for some camera, a fast tramsition from day to night vision and viceversa (i.e. a sun ray refled by a passing car in the street) could be recognized as motion (so as a false alarm by the system 😦 )…so the best way to place the camera is in front of closed external doors without glasses and of closed windows with the rolling shutter completely closed.

Well… do you placed the alarm siren and cameras? Have you configured your cameras in order to connect to your modem/router and to send an email using your Google mail account when a motion is detected? Very well… we can go ahead with the system idea.

This is the overview schema of the system (as always drawn by hand by me, sorry for the bad photo! 😉 ):

wpid-2014-11-10-08.37.09.jpg.jpeg

…In practice at this moment we have all cameras connected to our modem/router and a alarm siren connected to the power thru a relay commanded by the Raspberry PI. So, we must to setup the Raspberry PI in order to execute the following operations/requirements:

  • Periodically it should check the SENT folder of your Google Mail account, in order to verify if one of your IP cameras detected one motion (and so they sent an email using your “home account”). The cycle should be fast because one burglar can be very fast to open a window and to move in your house… 😦
  • If one or more email arrived from your cameras, it should activate the relay in order to power ON the alarm siren
  • In this case it shoud send an SMS to your mobile phone in order to advise you that the siren has been powered ON
  • It should manage a set of SMS commands in order to: force the power OFF of the alarm siren, enable and disable the check of the sent emails, cancel the SMS memory of the SIM900 module, reset or reboot the system etc.
  • It should send a set of SMS in order to advise you that there is some problem (i.e. the internet connection is down, so the Google Mail mailbox can’t be accessed).

Well. It is’nt so difficult to implement it all. If you you read first these previous posts from Garretlabs: THIS ONE (it uses a GSM dongle and the software gammu in order to receive/send the SMS messages, plus to command the GPIO pins of Raspberry using Python) and also THIS ONE (it uses the SIM900 module and the AT commands in order to receive/send the SMS messages).

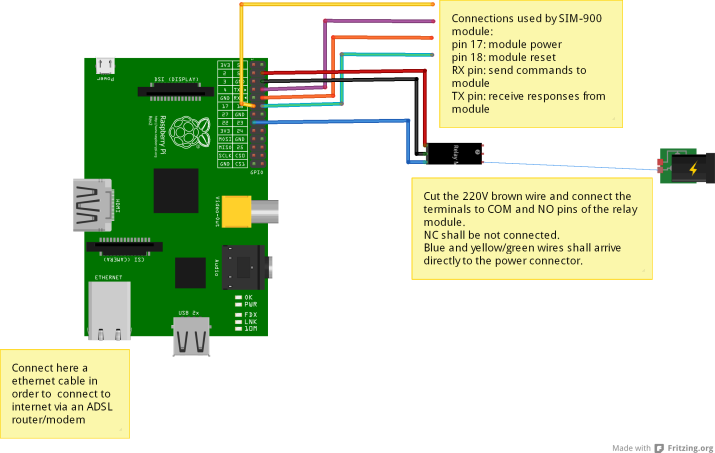
This is the Fritzing schema of the controller Raspberry PI+SIM900 module used to command the relay for the alarm siren:

Video surveillance controller (finale per uso con SIM900) v2_bb

I propose you the complete code of my project…. so you can now start playing with the RasPI-Surv system


#! /usr/bin/env python

import RPi.GPIO as GPIO
import imaplib, re, time, serial, subprocess

#class from http://segfault.in/2010/07/playing-with-python-and-gmail-part-1/ and http://segfault.in/2010/08/playing-with-python-and-gmail-part-2/
class pygmail(object):
    def __init__(self):
        self.IMAP_SERVER='imap.gmail.com'
        self.IMAP_PORT=993
        self.M = None
        self.response = None
        self.mailboxes = []

    def login(self, username, password):
        self.M = imaplib.IMAP4_SSL(self.IMAP_SERVER, self.IMAP_PORT)
        rc, self.response = self.M.login(username, password)
        return rc

    def get_mailboxes(self):
        rc, self.response = self.M.list()
        for item in self.response:
            self.mailboxes.append(item.split()[-1])
        return rc

    def get_mail_count(self, folder='Inbox'):
        rc, self.response = self.M.select(folder)
        return self.response[0]

    def get_unread_count(self, folder='Inbox'):
        rc, self.response = self.M.status(folder, "(UNSEEN)")
        unreadCount = re.search("UNSEEN (\d+)", self.response[0]).group(1)
        return unreadCount

    def get_imap_quota(self):
        quotaStr = self.M.getquotaroot("Inbox")[1][1][0]
        r = re.compile('\d+').findall(quotaStr)
        if r == []:
            r.append(0)
            r.append(0)
        return float(r[1])/1024, float(r[0])/1024

    def get_mails_from(self, uid, folder='Inbox'):
        status, count = self.M.select(folder, readonly=1)
        status, response = self.M.search(None, 'FROM', uid)
        email_ids = [e_id for e_id in response[0].split()]
        return email_ids

    def get_mail_from_id(self, id):
        status, response = self.M.fetch(id, '(body[header.fields (subject)])')
        return response

    def rename_mailbox(self, oldmailbox, newmailbox):
        rc, self.response = self.M.rename(oldmailbox, newmailbox)
        return rc

    def create_mailbox(self, mailbox):
        rc, self.response = self.M.create(mailbox)
        return rc

    def delete_mailbox(self, mailbox):
        rc, self.response = self.M.delete(mailbox)
        return rc

    def logout(self):
        self.M.logout()

#end library/class

##############################################################################
#Functions to PowerON OFF the relay
##############################################################################
#poweron the relay
def PowerONRelay():
    GPIO.setup(22,GPIO.OUT);
    GPIO.output(22,GPIO.HIGH);
    return;

#poweroff the relay
def PowerOFFRelay():
    GPIO.setup(22,GPIO.OUT);
    GPIO.output(22,GPIO.LOW);
    return;

##############################################################################
#Functions to manage SMS
##############################################################################
#check unread arrived messages
def CheckNewUnreadMessage(ser):
    print "Check for new messages..\n";
    ser.write("at\r");
    time.sleep(3);
    line=ser.read(size=64);
    #print line;
    ser.write('AT+CMGL="REC UNREAD"\r')
    time.sleep(3);
    response=ser.read(size=200);
    print response;
    return response;

#function to send confirmation SMS
def SendSMS(ser,value):
    #send SMS about the action
    ser.write("at\r");
    time.sleep(3);
    line=ser.read(size=64);
    print line;
    ser.write('AT+CMGS="+391234567890"\r'); #here put your phone number :-)
    time.sleep(3);
    if (value==1):
        ser.write('ALARM ON!\r');
    elif (value==0):
        ser.write('ALARM OFF!\r');
    elif (value==3):
        ser.write('ALARM enabled!\r');
    elif (value==4):
        ser.write('ALARM disabled!\r');
    elif (value==11):
        ser.write('ALARM commanded OFF (was ON)!\r');
    elif (value==20):
      ser.write('Deleted SIM memory!\r');
        elif (value==50):
      ser.write('INTERNET DOWN!\r');
    elif (value==51):
      ser.write('INTERNET UP!\r');
    elif (value==60):
      ser.write('Warning: GMAIL temporary DOWN!\r');
    time.sleep(3);
    ser.write(chr(26));
    return;

#function to delete messages...(GSM900 stores only 30 messages..)
def DeleteAllMsg(ser):
    ser.write("at\r");
    time.sleep(3);
    line=ser.read(size=64);
    print line;
    print "Deleting memory....";
    ser.write('AT+CMGD=1,4\r');
    time.sleep(3);
    return;    

###############################################################################
#main program for alarm check
###############################################################################
#global variables
initials_sent_emails=0
ALARM_enabled=True
ALARM_ON=False
actual_sent_emails=0;
ALARM_ON_cycles=0;
INTERNET_UP=True;
GMAIL_UP=True;
################################################################################
#functions to enable/disable/stop alarm (sent VIA SMS)
################################################################################
def enable_ALARM():
         global ALARM_enabled
         ALARM_enabled=True
         

def disable_ALARM():
         global ALARM_enabled
         ALARM_enabled=False
         

def stop_ALARM():
        global initials_sent_emails
        global actual_sent_emails
        #ALARM_ON=False
        initials_sent_emails=actual_sent_emails
        #ALARM_ON_cycles=0
        #TODO here send SMS telemetry

################################################################################
#MAIN program
################################################################################

#0: power ON the SIM900 module and waits for SIM registration
GPIO.setmode(GPIO.BCM)
GPIO.setup(17,GPIO.OUT)
GPIO.output(17,GPIO.HIGH)
print "Registering the sim...\n";
time.sleep(15); #wait for sim to register to the net
#0a: open serial link on /dev/ttyAMA0. It is open only one time:it remains open for all operation time.
#No more open+close action is now requested.
print "Opening communications serial...\n";
ser=serial.Serial('/dev/ttyAMA0',9600,timeout=1);
ser.open();


#1: first login to Gmail
g = pygmail()
g.login('your.home.mailbox@gmail.com', 'yourpassword')
print g.response

#2: list mailboxes
g.get_mailboxes()
for item in g.mailboxes:
  print item

#3: get number of sent emails at power ON of alarm controller...
g.get_mail_count('[Gmail]/Posta inviata')
print g.response
sent_number=g.response[0]
initials_sent_emails=int(sent_number) #actual number of sent messages
print initials_sent_emails

#4:logout from gmail
g.logout();


#Here we add the infinite loop (once per 10 seconds?) which:
#a. checks the number of sent emails (login+get_mails_count+logout)
#b. if the number is > initials_sent_emails sets (&& the alarm is ARMED) the alarm relay ON, else sets the alarm relay OFF
#b2. if this is the first time the alarm is ON, send SMS to communicate the ALARM is correctly ON!
#c. checks if a NEW SMS is arrived in order to enable/disable ALARM relay, and update the global variable
#d: waits for 10 seconds (TBC)
while (True):

       #a0: check for internet status
    ip="www.google.it";
        ret=subprocess.call("ping -c 1 %s" %ip,
        shell=True,
        stdout=open('/dev/null','w'),
        stderr=subprocess.STDOUT)
    if (ret==0):
         print "INTERNET UP!"
        if(INTERNET_UP==False):
            INTERNET_UP=True;
            SendSMS(ser, 51);
    else:
        print "INTERNET DOWN!"
        if (INTERNET_UP==True):
            INTERNET_UP=False;
            SendSMS(ser, 50);

    
       #a: check new sent messages
    if (INTERNET_UP==True):
            print 'Check new sent messages...'
        try:
                g.login('your.home.mailbox@gmail.com', 'yourpassword')
                g.get_mail_count('[Gmail]/Posta inviata')
                actual_sent_emails=int(g.response[0])
                g.logout();
            GMAIL_UP=True
        except imaplib.IMAP4.error, err:
            print 'GMAIL IMAP temporary unavailable!!!'
            if (GMAIL_UP==True):#the first time it sends an sms...
                SendSMS(ser,60)
                GMAIL_UP=False        

        #b/b2: alarm management
        print 'Alarm management...'
        if(ALARM_enabled==1 and actual_sent_emails>initials_sent_emails):
                print 'ALARM ON!!!'
                ALARM_ON=True
                ALARM_ON_cycles=ALARM_ON_cycles+1;
                #here we command the relay ON
                PowerONRelay();
                if (ALARM_ON_cycles==1):
                        SendSMS(ser,1);
                
        else:
                if(ALARM_ON==True):
                        SendSMS(ser,0); #if the alarm is already OFF, dont send messages...
                ALARM_ON=False
                ALARM_ON_cycles=0;
                #here we command the relay OFF
                PowerOFFRelay();
                print 'ALARM OFF!'

        #c: new SMS arrived management
        print 'SMS management'
    message=CheckNewUnreadMessage(ser);
    if(message.find("enablealarm")<>-1):
        enable_ALARM();
        #send message to my phone that Relay is ON
            SendSMS(ser, 3);
        print "Alarm enabled commanded\n";    
    elif (message.find("disablealarm")<>-1):
        disable_ALARM();
        SendSMS(ser, 4);
        print "Alarm disabled commanded\n";
    elif (message.find("alarmoff")<>-1):
        stop_ALARM();
        #send message to my phone that telemetries are OFF
          SendSMS(ser, 11);
        print "Deactivated alarm\n";
        elif (message.find("delsms")<>-1):
        DeleteAllMsg(ser);
        SendSMS(ser,20);

       
        #d: basic cycle time
        print 'Wait for new cycle...'
        time.sleep(2);


Weeeeeeell….I Hope the code is well commented,so it is not so unreadable! 😉

As you see, I used a very nice Python library in order to connect to Google Mail using IMAP. You can download it from Segfault.in, and you can find good examples in the following pages: http://segfault.in/2010/07/playing-with-python-and-gmail-part-1/  and http://segfault.in/2010/08/playing-with-python-and-gmail-part-2/.

…Anyway, if you want to request some detail…I am here for you! 🙂

And as usual, if you want to comment/modify/correct/redistribute/relink my code and my idea, you ‘re free to do it (…and thanks for the your pingbacks and for credits in your blogs etc. 😉 )!

Bye bye geek guys and girls… it’s time for me to go to install and test the system in my friend’s house (also if it’s too late for his vacation time..ah ah!!!)! 🙂

 

Raspberry and the remote controlled relay: a low-level approach (a.k.a. “AT modem commands: the usual suspects”).

Hi my dear microelectronics F&M (female & male) friends! 😉
Here we are again with the remote controlled 220V relay using a Raspberry PI. In my previous post I used a Huawei 3G dongle with the famous gammu daemon as SMS receiver.
But… do you remember the end of the post? I was talking about a thriller/horror movie by the great Lucio Fulci.
So, the horror turned to real, since gammu-smsd, after 20-25 minutes of correct activity, decided to die himself, without any clear cause. Or better, it continued running in background but when a SMS arrived, the daemon did nothing.
I tried to “reanimate” it in several ways, removing the screensaver and the blank screen from the Raspberry, writing a script which stop/restart the daemon every 5 minutes etc. But nothing changed. 😦
I noticed also after the above mentioned 20-25 minutes, the daemon start/restart (using sudo /etc/init.d/gammu-smsd start/restart) fails.
Only a reboot works in this case….but NO PANIC please! 🙂

I think there is some problem in gammu-smsd (related to Raspbian memory management? Hmmmm…I dont want investigate it because I want to live again 😉 ).
So….I decided to try another approach, using a more simple hardware and writing myself a more simple (= with a simple maintance and debug phases) software.
I bought the ITEAD GSM Sim900 module for Raspberry PI from my usual store (Robot Italy). Price: 37 euros. I think it is a good price for a GSM/GPRS phone without keys and display! 😉
I placed my SIM in the module, then I placed the module on the Raspberry.
The module reports the unused GPIOs on the higher side, so I connected the three wires used to command the relay (Vcc, GND and command) directly to the SIM900 module.
Note that the Vcc available on the SIM900 module is 3.3V , but I noticed that my relay module works well also using 3.3V instead the requested 5V. 🙂
Note also that GPIO18 used to command the relay in my previous post, is used now by SIM900 module as software reset, so I modified my relay ON/OFF scripts in order to use GPIO22.

This is the schema of SIM900 module used GPIOs:Mappatura RasPi GPIO-ITEAD SIM900
Ok, let’s go powering the Raspberry board (with a 2A minimum power supplier, since the SIM900 can use also peaks of current of 1A).
But firstly I needed the right soundtrack for this activity, and the right soundtrack in this case is “The City Sleeps”, a powerful and aggressive crossover-progressive rock cd, in my opinion the best work of Touchstone, the band of my friend Kim Seviour.

Let’s return to us… now the Raspberry boots up but the SIM900 module is powered off (no green led is ON on the surface).
There are two ways to power it on:

  • the first approach is to simply press the power on button :-). Too simple for me.;-)
  • the second way is to set the GPIO17 high….well, you know this is my preferred solution. 😉

The python code (remember you must before install python extensions devoted to GPIO commanding, following my previous post!) is the following:

#poweron the RPI GSM SIM900 module
def PowerON_SIM900_module():
    GPIO.setup(17,GPIO.OUT)
    GPIO.output(17,GPIO.HIGH)
    return;

Raspberry talks with SIM900 module via a serial link mapped on /dev/ttyAMA0, but Raspberry locks this port at startup. The document reporting the correct actions to free the serial port (before to try to talk with the module) are in ITEAD provided C library…but they are written in chinese! 😦
So I googled aroud a lot before to find the solution to this problem, damn! 😦
This is the correct procedure in order to “unlock” /dev/ttyAMA0 port (application note taken from ITEAD blog, related to another ITEAD product):

In /etc/bootline.txt change:

dwc_otg.lpm_enable=0 console=ttyAMA0,115200 kgdboc=ttyAMA0,115200 console=tty1 root=/dev/mmcblk0p6 rootfstype=ext4 elevator=deadline rootwait

to:

dwc_otg.lpm_enable=0 console=tty1 root=/dev/mmcblk0p6 rootfstype=ext4 elevator=deadline rootwait

and in /etc/inittab comment out or delete the following line (in my case it is the last line):

# T0: 23: respawn :/ sbin / getty-L ttyAMA0 115200 vt100

Well…after this, a reboot is necessary.

The Itead GSM module...with "The City Sleeps" of Touchstone!

The Itead GSM module…with “The City Sleeps” of Touchstone!

Now, I tried using the examples provided in the official C library from ITEAD, but I encountered some error (very strange errors, such as “SIM not registered, some unpredictable error code and so on…), so I decided to talk directly to SIM900 module using AT commands.

Firstly I installed the old, well known minicom software then I connected minicom to SIM900 module with the following (the “old style values”) parameters: port: /dev/ttyAMA0, speed: 9600 bps, no flow control, no parity, 8 bit per word, 1 stop bit.

I sent some famous AT commands, such as “AT” (in order to verify if the momdem is responding), “AT+CMGS” (in order to send to my phone a text SMS), etc. and I verified that all worked well.

Quasi-incredible! 🙂

At this point I decided to implement (in Python, of course) the main code, which: receives the SMS message (many thanks to this tutorial for inspiration of this part), parses them and, if a valid command is received, it powers ON/OFF the relay. Plus, the script can send to my phone  a SMS reporting the action (Power ON/OFF) executed.

I used only three AT simple commands:

  • AT (in order to verify if the communication between module and Raspberry is OK)
  • AT+CMGS (used to send SMS messages)
  • AT+CMGL= “REC UNREAD” (used to read received unread messages)

Note that I added some delay, since I noticed that in some case the modem is a little slow to execute the AT commmands and to reply. This is the complete Python code.

But first don’t forget to install the python extension for serial communication using sudo apt-get install python-serial.

#! /usr/bin/env python

import serial
import time
import RPi.GPIO as GPIO

GPIO.setmode(GPIO.BCM)

#poweron the RPI GSM SIM900 module
def PowerON_SIM900_module():
    GPIO.setup(17,GPIO.OUT)
    GPIO.output(17,GPIO.HIGH)
    return;

def PowerONRelay():
    GPIO.setup(22,GPIO.OUT);
    GPIO.output(22,GPIO.HIGH);
    #send message to my phone that Relay is ON
    SendSMS(1);
    return;

def PowerOFFRelay():
    GPIO.setup(22,GPIO.OUT);
    GPIO.output(22,GPIO.LOW);
    #send message to my phone that Relay is OFF
    SendSMS(0);
    return;


def SendSMS(value):
   #send SMS about the action
   ser=serial.Serial('/dev/ttyAMA0',9600,timeout=1);
   ser.open();
   ser.write("at\r");
   time.sleep(3);
   line=ser.read(size=64);
   print line;
   ser.write('AT+CMGS="+39123456"\r');
   time.sleep(3);
   if (value==1):
       ser.write('Relay powered ON!\r');
   elif (value==0):
       ser.write('Relay powered OFF!\r');
   time.sleep(3);
   ser.write(chr(26));
   ser.close();
   return;

def CheckNewUnreadMessage():
   print "Check for new messages..\n";
   ser=serial.Serial('/dev/ttyAMA0',9600,timeout=1);
   ser.open();
   ser.write("at\r");
   time.sleep(3);
   line=ser.read(size=64);
   #print line;
   ser.write('AT+CMGL="REC UNREAD"\r')
   time.sleep(3);
   response=ser.read(size=200);
   print response;
   ser.close();
   return response;

#main loop
   PowerON_SIM900_module();
   print "Registering the sim...\n";
   time.sleep(15); #wait for sim to resgister to the net
   print "Started main loop\n";
   while True:
      message=CheckNewUnreadMessage();
      if(message.find("poweron")<>-1):
          PowerONRelay();
          print "PowerON commanded\n";
      elif (message.find("poweroff")<>-1):
          PowerOFFRelay();
          print "PowerOFF commanded\n";
     time.sleep(5);

As you see from the code, the new, unread SMS messages are checked every 5 seconds.

If a new message is found, it is copied in the message variable. If the message contains the poweron keyword the relay is powered ON. Else,  if it contains the poweroff keyword, the relay is powered OFF.

In both cases a SMS is sent to my phone (well… this is not my real number, also if I know you would like to know it! 😉 )

In order to auto-start the script after the Raspberry boot, you should add this command to /etc/rc.local (prior, remember to “executabilize” 😀  your script using the old chmod +x name_of_your_script.py ):

sudo /home/pi/name_of_your_script.py &

IMPORTANT NOTE: Add the “&” in order to launch in background the Python script, or you won’t be able to stop it neither using CTRL+C or swithcing shell . I will re-take the control of your Raspberry only via remote connection (using ssh)! 🙂

Now, rebooting the Raspberry, you will be able to receive/send SMS message using AT commands, power ON/OFF a 220V relay…and the most important thing: I tested the system for 3+ hours, and it worked well all time!!!

So ….I think we executed today another litlle step in my and in your “knowledge database system” called BRAIN. 🙂

Now I will take a relax time with the aid of the new Touchstone cd: “Oceans of Time”. It’s an kick-ass prog-rock album, of highest level guaranteed (as we say in Italy, it’s “Lemon guaranteed”, that is “Garantito al limone”).

Bye bye Raspberry freaks, it’s rock time for me! 😉


Raspberry PI: A remote controlled relay using SMS messages

Hi my dear female & male microelectronics geeks!

This time I will build an interesting object: a remote controlled relay using a Raspberry PI as SMS messages receiver and parser (and -obviously- as relay phisical controller).

I will use this stand-alone (sub)system with my meteo station system. If you want to read more about the meteo station, in the previous posts I described the I2C communication between the acquisition board (Arduino UNO) and the station controller, the model (hardware and software) of the acquisition board.
In this post we will PLAY WITH THE HIGH VOLTAGE, so… pay attention,please. 🙂
Rememeber that when we use the high voltage..the only safe thing you can consider is the GROUND, so… again, pay attention please! 🙂

Why high voltage? Well… it’s simple.
Because I would like to power on/off my meteo station via remote commands (since at the end of this “technical adventure” I will install my meteo station in a very beautiful place, but a little far from my home).
In order to do that, I would like to use a simple (sub)system, consisting of one Raspberry PI (for this purpose you can use also the less expensive model A, but in my project I will use again a Model B.Yeah, you know I love this board …but I assure you I’m preparing some surprise also with my new Olinuxino A20! 😉 ), one Itead 2-way Relay Module (bought as usual from Robot Italy), one multiple power connector bought (…from my father) at the cheapest general-purpose shop in my little city (it is called “Risparmio Casa”, in English it should be something like “Savings -for the- House”), and, last but not least, one USB 3G dongle (I used an old Huawey K3715 compatible E169, marketed by Vodafone, with a TIM sim inside) which I will use as “mobile phone” in order to receive SMS messages.

In this case I will not use it as “internet 3G dongle” because:

  1.  I want to command the power on/off even if the 3G signal is not present
  2.  Sending single SMS messages is cheaper than a flat 3G connection (in Italy, I don’t know if the situation is the same in other countries)
  3. The power consuption is lower if the dongle is not connected to 3G

Ok, let’s go with the experiment! 😉

Commanding the relay using Python

I took the inspiration for this step , from this post of the italian blog “Raspibo.org”
Let’s install something!

#sudo apt-get update
#sudo apt-get install python-rpi.gpio
#sudo apt-get install python3-rpi.gpio

Well, after this you can connect Raspberry and the Itead relay module .

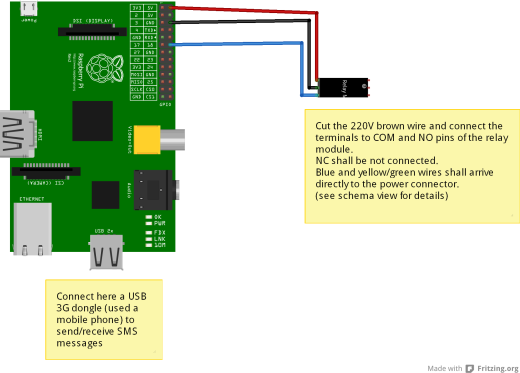
GPIO18 will be used as command signal for relay, plus you will connect the Raspberry 5V/GND pins to the module Vcc/Gnd pins. This is the Fritzing schema:

Arduino rele controller_bb

Then you can modify the multiple power connector in the following mode: remove a part of external protection from the cable (pay attention in this operation, please!), then cut the 220V brown wire and connect the terminals to COM and NO pins of the relay module. NC shall be not connected. Blue and yellow/green wires shall arrive directly to the power connector.

Ok, now we can test the relay (with the 220V power NOT connected, for the moment).

Firstly we must write a script in order to initialize to LOW the GPIO18 pin at Raspberry startup. The script will be:

#!/usr/bin/env python
import Rpi.GPIO as GPIO
GPIO.setmode(GPIO.BCM)
GPIO.setup(18, GPIO.OUT, initial=GPIO.LOW)

 Then, you can save it where you want, and you must to change the mode in order to declare the script as executable:

#chmod +x initialize_GPIO18_script.py

…But the very important thing is to add the following line to /etc/rc.local:

sudo /path_to_initialize_GPIO18_script/initialize_GPIO18_script.py

and execute a reboot of the board.

After the reboot, the GPIO18 will be correctly initialized, so you could test the relay functionality. In order to close the relay you will write the following script:

#!/usr/bin/env python
import Rpi.GPIO as GPIO
GPIO.setmode(GPIO.BCM)
GPIO.setup(18, GPIO.OUT)
GPIO.output(18, GPIO.HIGH)

and in order to open the relay you will write the following script:

#!/usr/bin/env python
import Rpi.GPIO as GPIO
GPIO.setmode(GPIO.BCM)
GPIO.setup(18, GPIO.OUT)
GPIO.output(18, GPIO.LOW)

Note that all the executions of GPIO-related scripts will be possible only using “sudo” before the commands.

Well… if your scripts work well, open the relay (=led powered off on the Itead module): this is the safer state.

Now it’s the moment to connect the multiple power connector to the 220Volts plug on the wall….but, REMEMBER THAT THIS OPERATION CAN BE DANGEROUS AND YOU MUST USE ALL AVAILABLE PROTECTIONS in order to reduce risks. Remember that you are now playing with HIGH VOLTAGE, so PAY ATTENTION.

To test the relay behavior now you connect a lamp (or something else) to the multiple power connector and use the above scripts to power on/off it.

…..Aufffff, I hope all worked well, and you haven’t burnt your home! 😉


Connecting the USB 3G dongle and configuring it in order to receive (and send) SMS messages

Ok, now a little more relaxed activity: we must receive SMS messages using a 3G dongle and we must to parse them in order to command the relay.

I’ve done the following steps in order to make all things work without problems (after maaaaaaaany experiments, overall tied to the files/directories permissions and to users execution policies…. 😦 ).

1. Power Off your Raspberry
2. Connect the USB 3G dongle, then power on the Raspberry. My dongle is correctly recognized by Raspbian as 3G modem on /dev/ttyUSB0 [IMPORTANT NOTE: some USB dongle -i.e. Huawey E1820- is recognized by Raspian as CD-ROM… so you should use some “howto” regarding the utility usbmodeswitch in order to correctly recognize the modem inside the dongle]
3. Install gammu and gammu-smsd. Gammu is used to send SMS message, gammu-smsd is the daemon used to receive the SMS.

#sudo apt-get install gammu 
#sudo apt-get install gammu-smsd

4. Configure the file /etc/gammu-smsdrc in the following way:

port = /dev/ttyUSB0
connection= at19200
[...]
logfile = /home/pi/log-gammu.txt
service = file 
RunOnReceive = sudo /home/pi/Script_relay/sms_relay.py
[...]
inboxpath= /home/pi/Script_relay/inbox_sms/

5. Save the file, then add the user “gammu” to “sudoers” group of your Raspberry, using the tool visudo:

#sudo visudo

It will open /etc/sudoers.rc…so you append the following line to the file :

gammu ALL=(ALL) NOPASSWD: ALL

[NOTE: you can report /home/pi/Script_relay/sms_relay.py instead of ALL, for security reasons]

6. Save the file and Reboot you Raspberry. The gammu-smsd daemon starts automatically at the end of boot process.
7. Verify that in /home/pi/gammu-log.txt there arent’t strange errors (tied to communication between Raspi and the dongle). I encountered these errors when I installed gammu-smsd without the dongle already connected. Anyway, in this case you can remove the installation and you can reinstall gammu-smsd:

#sudo apt-get –purge autoremove gammu-smsd
#sudo apt-get gammu-smsd

8. Create the filesystem used by the gammu-smsd configuration:

#mkdir /home/pi/Script_relay
#mkdir /home/pi/Script_relay/inbox_sms
#chmod 777 /home/pi/Script_relay/inbox_sms

[NOTE: I imposed the simple mode 777 in order to permit to “gammu” user to save the SMS messages in this folder -and it’s work-, but you can use some more secure access]

9. Create the code for /home/pi/Script_relay/sms_relay.py in the follwing way:

#!/usr/bin/env python
import Rpi.GPIO as GPIO
import sys
GPIO.setmode(GPIO.BCM)
#note we don't initialize the initial value of GPIO18, we use the current status
GPIO.setup(18, GPIO.OUT)
#the filename of the SMS is passed as argument to the script from the RunOnReceive gammu-smsd option 
filename=str(sys.argv[1]) 
complete_filename="/home/pi/Script_relay/inbox_sms/"+filename 
sms_file=open(complete_filename,"r") 
message=sms_file.read(160) #note that a not-parted SMS can be maximum 160 characters 
if (message.find("poweron")<>-1): 
     GPIO.output(18, GPIO.HIGH) 
elif (message.find("poweroff")<>-1): 
     GPIO.output(18, GPIO.LOW)

That’s all folks!

If all worked correctly, sending now to the dongle telephone number a SMS containing the keyword poweron you will see that the relay will be powered on, and sending an SMS containg the keyword poweroff you will see that the relay will be powered off.

…It’s a magical thing, don’t you think that? 😉

wpid-20140520_063754.jpg

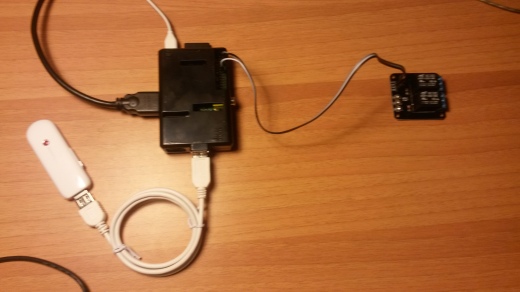
Finally…the complete relay controller

Possible improvements to the project (I give you them as exercises 🙂 )

1. Send a SMS message to a number (it should be the number of the phone which commanded the power on/off)when the relay has been powered on/off. You should modify the sms_relay.py adding a call to the gammu command line tool (find one of the many examples on internet for the usage). Note that the tool must be configured (his configuration file is /home/pi/.gammurc) with the following data:

port = /dev/ttyUSB0
connection= at19200

…But for this functionality there is a little (=big 😦 ) problem: gammu-smsd blocked the /dev/ttyUSB0, so….what could be a possible solution?

2.  Add to the /etc/gammu-smsdrc file one filter in order to accept SMS message only from YOUR phone. This is not difficult, there is a configuration parameter to add in the file (with the “white-listed” numbers)… you can find it in the gammu-smsd user guide! 🙂


Ok boys and girls, today we used the high voltage… you know that for a software and/or microelectronics engineer this is like a bungee-jumping. 😀

So, now I need only a good grappa an an italian horror (or thriller) movie of the ’70-’80 on my television.

Do you like Lucio Fulci movies?

A relaxing movie now...

A relaxing movie now…”The New York ripper” by Lucio Fulci

I know he is very famous all around the world (…except than in Italy 😦 ).

My Fulci preferred movie is “The New York Ripper” (italian title: “Lo Squartatore di New York”)…. I need a very relaxing night, after this dangerous and stressing post! 😉

Bye bye, see you soon!